5

Putting it into Perspective

The school day is now 45 minutes longer due to snow days. Instead of using the 35 minute extra art time for each class to continue to work on their current classwork, I've changed my perspective and decided to give each class a little challenge! 


2nd grade class #1 dove into perspective after watching a cool Reading Rainbow video on 1 point perspective. I borrowed an Elmo (document camera with projector) from their teacher to demo this lesson. . . I shouldn't have borrowed it because now I'm foaming at the mouth to have one. 


I copied off my own "Complete the Picture 1 Point Perspective Railroad Track" page. The picture had a horizon line, vanishing point, one diagonal line for the train track, one small telephone pole, and one large telephone pole. Students completed their pictures while I demoed on the Elmo. 
Supplies: "Complete the Picture page"
ruler, pencil, and eraser. 
Vocabulary:
Horizon line
Vertical, Diagonal, Curvy lines
Vanishing Point
Foreground, Middle ground, Background
Diagonal line
Construction lines
Awesome results!


2nd grade class #2 watched the same video, but this time I let them follow along with the artist that drew the 1 P.P. train track. Sorry no pics from that one. The students liked it so much I decided that we should try some shapes. 
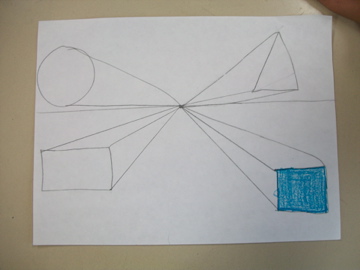
So we drew our Horizon line, vanishing point, and four shapes (square, rectangle, triangle, and circle). I told them we were going to use the same technique with our shapes and they would follow along while I demoed.  Students connected points and curves of their shapes to the vanishing point. Once two shapes were done together, students caught on and I let them continue on. Some even added more shapes with some stencils from the Free Choice Shelf. 


Stylish Blogger Award!


Rule # 1 Link back to the person who gave it to you:
Phyl from "There's a Dragon in my Art Room". She is so wonderful! I enjoy her blog so much and consider her a mentor in the blogging world. Thank you Phyl! 


Rule #2 List 7 things about yourself:
1. I am currently working 45 more minutes a day to make up for snow days... Doesn't sound so bad, but I am exhausted everyday I come home. Hence I haven't been blogging a lot lately...
2. I got married this year to the most wonderful man in the world! Wesley!
3. I love to cook, but I'm no good at it. I can't even begin to tell you why I'm no good at it, but trust me... I am. So this is my cooking Bible that Wes bought me as I joke one year.
4. I really want to try out decorating cakes.... When I have time to... This is one I made a Christmas. I may have blogged about it before.
5. I love to read.. or rather listen to books. I have a 30 minute drive to work and it helps me pass the time and tiredness by listening to books. 
6. I have very wide range of book interests. I love anything from Harry Potter and Sookie Stackhouse to Emily Griffin and Brent Weeks.


7. I almost majored in vocal music. I have been a broadway junkie since I was 5. I used to dream of being the next Bernadette Peters!
Rule #3 Pass the award on to 5 favorite blogs:
I love all 75 blogs that I follow! But these are the ones I have been referencing a lot lately: Congrats ladies!
1. Jessica at The Art of Education
2. Ms. Wilkinson at Wilkinson's Wonderful World of Art
3. Krystin at Her Dabbles
4. My good friend Crystal at Mrs. Jahnig's Art Space 
5. Pam at Panther's Palette


Thank you to all the bloggers out there for sharing your wonderful art worlds!


    8

    Watercolor Animal Weavings 4th grade Part II

    We left off here
    Day 3: We discussed weaving with the Warp and Weft. All students had finished painting one of the two drawings and were ready to create the warp of their weaving. 
    Place painting horizontally facing up and fold "hot dog" style. Place on the table with the opening of the hot dog at the top and the fold at the bottom! (very important)
    Line up a 1 1/2" paper strip (or rulers) at the top of the hot dog and trace a horizontal line. 
    Turn paper strip vertically and line up under the horizontal line. Trace vertically across the paper. 
    Cut along vertical lines and STOP just past the horizontal line. (we stop just past the line so that we have some wiggle room)
    Students that were not finished painting their second drawing continued to paint while the others finished the weaving. 
    Create the Weft with your second painting. Turn the painting over to the back and place it vertically on the table. Now, trace the  1 1/2" paper strip vertically across the paper. 
    Cut painting apart along vertical lines.
    Arrange painting back together like a puzzle and take away the top and bottom strips if your painting was drawn horizontal, or the left and right strips if your painting was draw vertically. (we will not have room for these two pieces)
    Take the first weft strip and weave it over and under through the warp. Tuck it into the correct place in the picture. Continue with the next weft strip, but this time start under and then repeat over under till finished. Proceed with remaining weft strips. 
    Usually 5 to 10 students completed this step on Day 3. Normally I would worry because many others still need to finish. However, this was a great way to see student mastery. All students that finished on day 3 were my teaching assistants on the forth and final day of weaving. I was so pleased with the students results and my assistants were wonderful "Little Art Teachers"!


    Overall I am very pleased with this lesson. I do think that next year I will have students paint a simple one color background, but I am still so pleased. 

    Artist Trading Cards with Art Enrichment

    I am lucky to have a school that allows us to provide many types of enrichment programs for our students. Today was the first day of the after school Art Enrichment class. The class is opened for 20 6th - 8th graders in the Fall and 20 3rd - 5th graders in the Spring who truly enjoy art and want to further explore their art making skills.

    For our first class we created Artist Trading Cards. I got out all the crafty "extras" like sequins, ribbon, beads, google eyes, confetti, etc... The cards were to reflect the artist.
    "When I look at these cards I want to be looking at a piece of you."
    Students were to create two cards. One card will be kept and the other will be traded. 
    Supplies: poster board paper cut to 3 1/2"x 4 1/2" cards, glue, scissors, tape, crafty extras, colored pencils, crayons, and makers. 
    I love letting the kids have the reins. Look at their great ideas:


    2

    Watercolor Animal Weavings Sneak Peak!!

    This is why I teach!
    This student finished his project one day ahead of the others. He was so excited that he finally "got it". Yes, he rushed, but he was so proud. This is a student who doesn't always do the best in school and it was amazing to see him so happy with himself. I am so proud of him too. I told him that next week he would be my assistant so we could both teach the rest of the class how it's done. Here is his wonderful watercolor animal weaving.
    To see part one of this lesson click HERE.
    Stay tuned for part 2!
    9

    Student Teacher

    Student teaching was one of the most stressful times in my life. Not because it was a bad experience, but I wanted to do so good that I think I pushed myself and stressed out way too much. I had two wonderful teachers teaching me. One was Mrs. Pam Hickman who taught me all of my organization, and teaching techniques. The other Mrs. Buchannan taught me how to be organized.... because her room looked like a bomb hit it. But in her defense it was an organized chaos that she could handle... I couldn't. I also had to learn the hard way that you have to have good classroom management no matter what age you teach. :)

    I am barely into my third year of teaching and I always thought it would be wonderful to have a student teacher... I just didn't think it'd be any time soon.. 

    Needless to say I was stunned when my principal came to me and told me I would have one in March! "Can I do that", I asked.
    "I don't see why not."
    "But I'm not experienced enough yet."
    "You came highly recommended and I agree that a student teacher would be honored to have you teach them."
    I don't like to brag on myself... It feels weird. In my head I was thinking.... "was I the last resort?" Her comment made me feel like I have accomplished something. I, the art teacher, have been noticed and appreciated. I love my job and I can't wait to spread that influence to someone else.

    I am already preparing. So far I have typed up all my classroom procedures for her to be familiar with. Of course I want her to try some of her own stuff out to. I liked having pros and cons told to me by my teachers, so I have created a sheet that I can right pros and cons down for her on each day. I believe in constructive criticism and positive reinforcement even for college students and I think this will be a good tool.

    So now I ask you:
    What are your tips for preparing for a student teacher?
    What are your good or bad experiences?
    What would you as the teacher have done better to prepare them?
    What did you like when you were student teaching?

    Back in my student teaching days Fall 2008
    Love how I'm the same size as the 5th grade students
    Some things never change, hence the name "Little Art Teacher"!
     
    5

    Watercolor Animal Weavings 4th grade Part I

    I am so excited about this project! I have never done a watercolor weaving and really wanted to try it out with my forth graders. 
    Objectives:
    The Student Will draw two pictures exactly the same of a real or make believe animal using pencil and black crayon that fill 80% of the space.
    TSW paint both pictures using watercolors with one picture painted using cool colors and the other painted using warm colors
    TSW cut one painting into 1 1/2" strips, horizontally for the Weft
    TSW fold the second paper in half "hot dog" style and cut 1 1/2" sections apart vertically for the Warp leaving an inch at the top and bottom. 
    TSW will weave the Weft papers through the Warp papers to create a watercolor weaving. 


    Here we go
    Day 1: We got warmed up by drawing a few animals to get the students in the mood. I made folders with simple "How to draw Animals" sheets for each table. Students didn't have to use the sheets, but this did help with those who were "stuck". 

    Some students even combined two animals! 
    A Liophin!
    Students drew the first drawing with pencil and then traced it with black crayon. The second paper was placed on top of the first so you could see through the paper to trace with black crayon once again. 
    Viola! Two identical drawings!
     Day Two: Use watercolors to paint one picture with warm colors...
     and the other with cool!
    I am so proud of the 4th grade drawings and I can pledge that I didn't touch 90% of them!! 
    Stay tuned for Part II!
    Back to Top