Showing posts with label Oil Pastel. Show all posts
6

High School… The beginning

    As my loyal followers know, I have made the switch from elementary to high school. It has been quite a whirl wind. To begin, I was hired to teach high school visual arts I. Two weeks before school started the 2nd art teacher had taken a job closer to home. I was floored and saddened because she is such an awesome person and I couldn't wait to work with her. She was also part of the reason I wanted to work there, but I totally understand why she decided to leave. We're still tight and she's a great mentor. That being said, I made the decision to take on the advanced classes art II, III, and AP instead. 


Me in my first official CHS faculty shirt.
   I know… wow! I have to admit that I panicked inside. My husband and I both knew that there would be tears and panic attacks. Yep, there were plenty. I'm not ashamed. "My name is Becca Ruth and I have panic attacks." Why was I panicking? Well, it's my alma matter and I am following in the footsteps of some pretty amazing art educators. Plus, I was coming from elementary to high school. I had student taught HS and it was amazing, but still. 
   My husband has been so supportive. He kept telling me that the reason I was panicking was because I wanted to do my best. I was working and pushing myself so hard to create a good classroom design, management plan, and lessons. "You're gonna kill it." he said. "You always do." I am not a perfectionist, but I research and plan my booty off to give my students the best. Well, that and I had a huge research paper due for one of my grad classes the first week of school. I also saw flashbacks of my first year of teaching. You know, "that year". The year we grow into our aprons. The year that we cried every day on the drive home. The year we lost or gained some weight through the process. I did not want to relive that year.
   Then an amazing thing happened. After my first full day with my classes it was like a weight had been lifted. My lessons went well, the students were exceptional, and nothing went wrong. It was like that the whole first week, and the week after that, and the week after that. I started to remember why I wanted to teach high school to begin with. I love the advanced classes. They want to be there, to be challenged, and learn. They work so hard. I could not have asked for a better first semester. So far so good. 
   I promise to blog more, but until then here are some snap shots of my first month at Columbia Central High School. 

Candy and Composition
Prisma Colored Pencils
Art III


Cube Yo' Face
oil pastel
Art III
 Analogous Still Life
Oil Pastel
Art II


0

Simple K or Pre-K Spider Webs

I wanted something supper simple for Kindergarten to do for Halloween week. Can't get much simpler then an oil pastel resist. 

Art Center
Rainbow Spider Web
Setup: 2 students share tempera cake pallets, 2 brushes, towel, water bucket, and small tray with two black oil pastels.

I begin each K lesson with their name on the back and then whatever the first tool is that we're using in the air.
First, using your oil pastel (repeat that word back to me) draw a stand up line in the middle from the top to the bottom. 
Next, draw a laying down line through the middle. 
Then, two slash lines (how many?) Start one in the top right hand corner and slash it to the bottom left. Now, start in the top left hand corner and slash it to the bottom right. 
Circle time! 
Point to the middle of your web and draw a small circle, then a medium circle around it, and finally draw draw a large circle around that. Put the pastel in your tray and we're ready to paint. 

Always demo before they begin to paint. I have them hold their brush in the air while they watch me. Don't paint the whole thing while they wait. Just two color changes worth, and don't take forever. 
Swish, wipe, blot! Before you paint and when you change colors.
You may paint your webs. 


These turned out so beautiful!


Once the Art center was on a role I walked over to the play dough center I asked students how to make a spider. 
How many legs does a spider have? How many body parts? 
I had no requirements at the lego table, but many of them built spider homes. (sorry no pics)
9

Abstract Warm-up

   The first day of class with my 6th graders can be a bit overwhelming. I preach rules, procedures, and expectations. They are usually surprised at the new things they will be expected to do in "Middle School" art and can be a little timid. 
   After all the speeches are said and done I like for them to start creating.  I always begin 6th grade with Abstract Art. I try to find an interesting youtube video to show that gets the kids excited. I won't tell them what abstract art is though. I ask them at the end of the video to tell me. 9 times out of 10 they will get it.
   It is now time to create. As wide a topic and endless the ideas for abstract is, I have always found that it is hard for most students to begin an abstract work. So I help them along with this abstract warm-up:

Materials:
Markers, crayons, oil pastels, colored pencils, or paint.
12"x18" paper

Teacher reads the directions as students follow along.
Please be sure to allow at least a minute for each step. 

Abstract Warm-Up:
1. Turn your paper in any direction
2. With your marker make three straight lines anywhere on your paper, but start each line on an edge and end on an edge. Lines may cross if you wish.
3. Make three dots any size, anywhere on your paper. Remember to color your dots in. 
4. Place the tip of your marker on one of the dots. Now make a curved line or a lot of curved lines that go in any direction as long as they go to an edge.
5. With your marker make one circle that touches something else on your paper. 
6. You may add to your design by making more lines and shapes if you wish.
7. Complete your abstract work by adding as many colors as you wish. Remember to leave only one space blank on your design. 
Abstract warm up with steps 1 - 5. I always use oil pastel on black paper. 
Wish I had taken more pictures of this lesson... The students always have great success with this project because they are given a little "push" into the creative process. I find that it builds their confidence. 
If you liked this warm up and would like some more ideas, send me your email. I have 3 more equally as popular with the students and greater in difficulty. 
Special thanks to Pam Hickman who gave me these abstracts when I was student teaching.
7

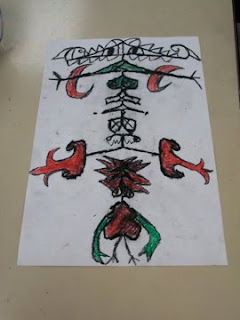
Name Aliens... Bugs... Whatever!

Such a huge success!
 I have called these designs bugs and aliens. Students prefer aliens because I began this project right after the movie Monsters vs. Aliens came out. I use to do this lesson as a one day filler lesson without the paint. But this year I decided to take it a little further.

Materials
12"x18" white 60 weight drawing paper, black oil pastels, pencils, crayons, liquid watercolor

We began by talking about two kinds of Balance: Symmetrical and Asymmetrical
I called on students to give me examples of shapes that were symmetrical and then asymmetrical. 

The first step was to fold your 12"x18" paper in half like a hot dog and then open it back up and turn the paper horizontally. 
"We want these Aliens big!" Therefore, students should write their name (with pencil) in cursive starting on the fold line and having their capital letter almost touch the top. (I always find that cursive brings the best results)
Once they have written their names with pencil, students will trace over their names with a black oil pastel. 
Next, fold the paper back in half like a hot dog and use a ruler to rub over the paper heavily. Please be sure not to rub too hard or the paper will tear. Students open their paper to see that the name has transfered. The transfer will be light so they will need to retrace the new side with the black oil pastel.   
Students may add new body parts and such to their Aliens, but the designs are symmetrical! What you add to one side must be added on the other!! 
Now, use crayons to add color to your Alien.
Once students have colored their Alien heavy and dark, the next step is to choose one color of Liquid watercolor paint.
( I pour them each a little of the color they want into a condiment cup and I add some water to make the paint last longer)


 Simply AWESOME! I didn't have one student that was not pleased by their Alien.


Back to Top