0

Simple K or Pre-K Spider Webs

I wanted something supper simple for Kindergarten to do for Halloween week. Can't get much simpler then an oil pastel resist. 

Art Center
Rainbow Spider Web
Setup: 2 students share tempera cake pallets, 2 brushes, towel, water bucket, and small tray with two black oil pastels.

I begin each K lesson with their name on the back and then whatever the first tool is that we're using in the air.
First, using your oil pastel (repeat that word back to me) draw a stand up line in the middle from the top to the bottom. 
Next, draw a laying down line through the middle. 
Then, two slash lines (how many?) Start one in the top right hand corner and slash it to the bottom left. Now, start in the top left hand corner and slash it to the bottom right. 
Circle time! 
Point to the middle of your web and draw a small circle, then a medium circle around it, and finally draw draw a large circle around that. Put the pastel in your tray and we're ready to paint. 

Always demo before they begin to paint. I have them hold their brush in the air while they watch me. Don't paint the whole thing while they wait. Just two color changes worth, and don't take forever. 
Swish, wipe, blot! Before you paint and when you change colors.
You may paint your webs. 


These turned out so beautiful!


Once the Art center was on a role I walked over to the play dough center I asked students how to make a spider. 
How many legs does a spider have? How many body parts? 
I had no requirements at the lego table, but many of them built spider homes. (sorry no pics)
5

Put a Cap on It

I love the pump lids that come with many gallon paints, but good GOSH I can't stand how much they clog... I even stopped using the pumps for a year because I was so tired of sticking a paper clip in there. Alas, I also did not enjoy tipping the gallon over to poor into my smaller paint bottles. 
Smaller paint bottle
I always wondered why someone could not come up with a stopper for the paint like they have for the Elmers glue pumps... Maybe they have, I just haven't found them yet. I don't spend my days googling paint pump stoppers. 
One day it finally hit me. I needed something I could mold to the pump to stay and fit perfectly...
MODEL MAGIC! Why had I not thought of this before? I just rolled a ball and stuck it on there and it fit like a glove.
This little cap comes off easily and is a perfect fit.
I've used it for a month now and no clogs! Thanks Crayola!! 
3

Art Room Portfolio Organization

I wish I had those flat file drawers or horizonal shelves, but I don't. Here's how I deal with portfolios.

My school is on an A - E day schedule. The first full day of the school year will be A day and we will continue from there. I love it because it ensures that no class will fall behind.

First, I divide my classes by A - E days with heavy cardboard pieces that are taller then the portfolios. It's much easier for me to sort by day then by grade.
"How do all the student portfolios fit in one tub?" They don't, by the end of the year I will need 4-5 tubs. 
 Next, each class is separated by a clip labeled with the class code. 
 As you can see all classes are in order by the schedule and not grade. Another easy way to grab and go or put away.
 Finally, every class has it's own "Master Portfolio" where I put all finished/graded work. Behind the master portfolio will be the student portfolios followed by class table folders that hold continuing projects. 
You may be wondering where the student portfolios are. I don't pass them out until our first "Ketchup Day". I believe that it is more beneficial to introduce the portfolio on the day you will actually utilize it. I usually have ketchup day after every third project. 

Inspiration
http://media-cache-ec0.pinimg.com/originals/4b/e4/bf/4be4bf5ef402eae261b54ab551d69663.jpg

http://www.flickr.com/photos/30897033@N04/4935276534/in/set-72157624826174412


11

Back to School... for ME

 Week one of grad school down!
I have been meaning to do this for years and it just never seemed like good timing and I couldn't decide on the best course. The field of education in Tennessee is crazy right now with new evaluations and student assessments. I will not go into that here. In spite of it all, I love my job and the field I have chosen and I will ride the wave and do my best for me and my students.  I feel like the arts are being pushed to the curb and not being viewed as a necessity. It is a fear of mine that years in the future art could be in jeperdy. I'm a prepared person and I've always had a plan B. I could pursue a masters in Art Education, but I have to think what will be the most beneficial for myself. 
I'm pursuing a masters in curriculum and instruction with a K-6th teaching endorsement. Once my degree is complete I will receive a pay increase, but what is most important to me is that I will have better job security. A masters in Art ed will not save me if they decide my school no longer needs art. If, IF, the arts were to ever go by the wayside, I would be able to teach in the regular ed classroom.
I have always enjoyed learning about the regular ed classroom. While many art teachers grumble and groan about extra duties such as assisting in the regular ed room, I enjoy it, and I understand why we need to help them. I'm very pleased that my principal has not shortened any of the specialists classes to make this happen and I still have my planning time. Assisting in these classrooms has opened my eyes to new teaching strategies, behavior management, and a better understanding of our regular ed counter parts. It has also shown the regular ed teachers that, HEY, these specialists really are teachers and we should support them too! I no longer feel like I am on my own floating island at my school. I can honestly say that I have all the regular ed teachers full support of me and our arts program. 
Yes, the arts are important! We need art in education. But we are educators first. A well rounded education is the most important thing, and now I'm doing that for myself.  
 My inspirations.


3

Last Minute Changes

I just had to share my last minute change to my "Free Choice" center. 
This treasure of a book cart was just sitting in our work room with a "who wants it" paper on it. So I snatched it.
I used to have my free choice center in my shelves along the wall. That was okay cause I didn't have room for it anywhere else. But that area was always getting congested. I ditched my rolling easel and brought in this baby. I've used it only one day and have had no traffic jams. 
 The front is perfect for my drawing books. Finally they wont be falling over!
 Right side. Easy access to materials.
Left side. I love how students can access three sides at once so they don't have much temptation to push and shove at clean up. 
9

A Blue Dog Art Room

I love the art work of George Rodrigue. Especially his Blue Dog. I have taught this Blue Dog lesson every year. It is always a huge success with students. 
This year I decided to make Blue Dog my theme. 
Blue letters for my "I Can" standards
Purple dog looking over our art word wall.
Orange dog reminding students to clean their paint brushes.
Red dog showing students who the helpers are for the day. 
Yellow dog reminding students to write their name, table, and code
If you're wondering why I have so many different color "Blue Dogs" then you should read this:
Here are some other sites around the room.

I love our "closets" but was tired of seeing the "stuff". I like the effect of the sheer fabric. Curtains $5 at Big Lots held up with simple $5 tension rods. 
My buckets got pretty rusty. I love these baskets also from Big Lots. 2 for $1.20
3, 2, 1 whole class points rewards


11

A New Spin on the Behavior Board

For the past four years I have stuck with my tried and true behavior board, "The card pull system". It has been fool proof, but the preparation for it was tedious and tiresome. I had to buy new pockets and index cards. Write the teachers' names and grades. Then, I had to take away from class time to have all students 1st - 4th write their names on the cards. After that, I would have to write all the Kindergarteners' names on theirs. Not to mention stapling and lining up each pocket. That board always took an hour out of my life and money to prepare. 

It was a wonderful management tool, but sometimes it took the kids FOREVER to find their card in the teacher's pocket. "I can't find it", they would lie or seriously couldn't. Then, sometimes they would pull someone else's card. At the end of the day when I wrote down who had sat out that day (and then therefor miss art party time) I would sneer. I guess they thought I'd forget who the culprit was.    

Out with the old and in with the new!
When I was in middle school, a teacher of mine had us write our name on the board when we misbehaved. That was the warning. Next, she would add a check mark. You might even get up to three checks then you had a detention. 

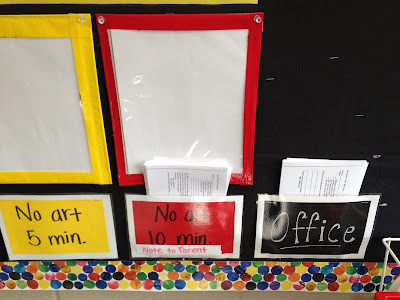
So I ran with a version of that. I made dry erase papers buy putting a thin piece of cardboard and a white piece of paper in a page protector. I then taped colored duct tape around the sides and tacked them to my board. I also placed a dry-erase marker in a cup close by.
The idea:
On 1st offense: write name on green warning board
2nd: write name on yellow 5 minute no art board
3rd: write name on red 10 minute no art board with an added parent communication note home
(they take a note out of the red pocket and hand it to me to write their name on it and the infraction. They must have it signed and brought back the next day or their teacher and myself will decide the next form of punishment)
The parent and office notes are kept handy! 
4th: the office. Students pull the office note for me to fill out and I send them with a buddy to the office. The buddy is to make sure the student gets there and doesn't hide out in the bathroom. (it's happened before)
I am still sticking to my, "If you get anytime no art then you have to serve the time again at the art party." I believe that is what really drives my management because it hits them twice. 
This might sound bad, but I can't wait to try it out.
:)
0

Sneak Peak

Just a little peak at some new ideas this year. Stay tuned

13

"Ketchup Day" in the Art Room

Have you ever had a handful of students not finish their work on time EVER? Are you tired of using your valuable planning time putting artwork into portfolios? Does it take too much time away from your lesson to pass out work for students to put into their portfolios or to take home? I WAS! Oh my gosh, and if I only passed out work and portfolios while the students just "waited"... I can't begin to tell you how many behavior problems I would have.  
Ever since seeing a painted ketchup bottle on many blogs, I have loved the idea of a "Ketchup" catch up day.  I don't think I ever successfully pulled one off or timed it right until this year. 
After each project most of us can agree that usually 3 to 4 students aren't able to finish within the "planned" project time due to illness, taking their time, or really doing their best. I do not include, "Due to misbehavior" because I nip that pretty quickly. 
Let's start with what "Ketchup Day" is.
"Ketchup Day" is a day for students to catch up on incomplete artwork. 
When is Ketchup Day? After every two projects. 
How long are most projects? Kindergarten through 2nd grade projects can take up to 2 days. 3rd - 4th grade projects can take 2 to 3 days to complete. 
Table folders filled with unfinished work. Portfolios underneath. 
How to prep for a Ketchup day
After each project, I put finished and graded projects for each class together with a clip and place it behind the class's portfolios in the bin. Unfinished work stays in the table folders also located behind the portfolios. 
Folders at top with unfinished work. Below are finished artworks ready to be handed out. 
How I "Ketchup"
I start with explaining that today is a Ketchup day which means we are going to catch up on work not completed, do some free choice, and put completed projects into their portfolios. 
If your artwork is in your folder it means you need to catch up. Materials needed for catch up are located on my table or at the sink.  Once you finish your work raise your hand for me to check, and then you may do free choice. 
Materials ready for catch up.
If you have no work in the folder then you are finished and may do "Free Choice" today. 
I will then allow the catch up people to get their materials. To avoid a stampede, the finished students will be called by table to get their first free choice activity. 

How I pass back work
Once students have been at work for about 10 minutes I explain that I will call names and pass out portfolios. They don't need to do anything with their portfolio except put it on their table. 
More finished and non-finished work.
Then, I explain that when I call their name this time I will be handing back graded artwork that needs to go into their portfolio. I also instruct students not to add to their finished artworks. 
Because students are working on free choice while I am passing back work, there are little to no misbehaviors because they are kept busy. 

I then go around and pick up the portfolios. I do this because I have been passing out work and have not been able to see what they have been working on. 
If you wish, during older grades students can pass out portfolios and work for you. 

I hope this helps many of you struggling getting students caught up and shows you that you don't have to use up your precious planning time putting work away. 

0

Kindergarten Love Notes

Happy almost Valentine's Day!!
Kindergarteners have been working on love notes. I love this project because it is supper simple, works on basic skills, and the kids love to give "Love Notes". It also lends itself to a 10 minute art center. 

What you need: Construction paper crayons, scissors, stick glue, heart shapes, and various colors of 4 1/2"x6" construction paper. 
My table set up: My tables sit 4 to 5. I place one box with scissors and glue, and a basket of construction paper crayons between two students to share. 
First, we talk about Valentine's Day, what it means, what is a symbol we see, and what do we give people on this holiday. We also talked about who you could give a love note to. 
Then, I explain that they must first pick up a heart and a color of construction paper from my table (choice). 
Next, they need to color their heart (coloring skills), cut it out (cutting skills), and make a glue circle on their construction paper (gluing skills), and glue their heart down. 


Then, they decorate the love note with the construction paper crayons. Finally, students flipped the note over and copied the phrase, "I love you!" on the back along with their name. 
Students were really excited that they could take their notes home that day and give it to someone. One student even said they would give their note to the principal. :)
 

 All in all this project was a quick way for me to assess students' cutting, coloring, gluing, and writing skills in one cute little package. 

The other centers that took place during this class included dry erase paper free drawing/writing and play dough. 


Back to Top