Good Behavior Art Party / Reward Party


I love to reward my students. I began good behavior art parties my first year of teaching after one of my student teacher placements did them. The parties are not only fun for the kids but they are a part of my behavior management plan.

It all begins with my whole class behavior chart.
With this chart each class had to get 9 green days to earn a party. This made it so classes could only earn 4 parties a year at most. Some classes would only get 2 a year...
This is my new game board chart. At the beginning of class classes start with 3 points. If they get too loud, or whatever else, they lose a point. At the end of class I move their game piece the number of points they have earned. There are 27 spaces. 27/3 is 9 for 9 weeks. Again, classes can earn up to 4 parties a year.

If a class misses a day due to an event or snow day I will automatically give them 3 points for the missed day.


Closer look at the game pieces. I use Post Its brand bookmarks.

FYI students love the game board more than the chart.


PARTY TIME!!
Most of the time I use ART CENTERS. Sound familiar to my faithful followers? Check here if not. 
Good Behavior Art Party centers are a bit different, but the set up and execution are the same. 
I set up 3 centers. I have 6 tables so I set up 2 tables for each center. Students may sit where they want as long as there are still 4 chairs at each table. I explain it to the kids as follows:

"For your Art Party you will be doing three centers. You will be at each center for 10 minutes. When the timer goes off you will clean up your center and sit quietly. Change to the next center when I say "GO". You may begin the next center as soon as you get there. "

Center times will depend on the amount of time you have. Adjust accordingly. 

I like to change my centers up a bit each nine weeks. Here are pics from my first parties this year. 
Shaving cream! I buy the Barbor brand cheep good stuff. 3 squirt lines per student and one  "reload" line at the halfway time. Cleanup: Student use wash cloths to wipe their hands and selves clean. The last group cleans the table with the same towels.

Free Paint. Only one paper. Must write name first. Don't forget to Swish, Wipe, and Blot. Cleanup: Paintings to the rack and refill water cups.

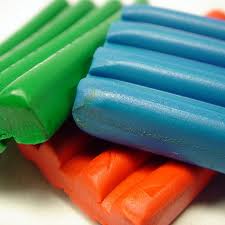
Play Dough! Each student gets one container of play dough. No mixing or sharing.  Cleanup: mush up all play dough crumbs and put back into container. 
Easy as 1, 2, 3. Every nine weeks I change the centers up, but I will usually leave painting because they love it so much. Make sure to rotate around the room to monitor. I explain the clean up directions as I go around the room. They will be more likely to remember the clean up directions if you give tell them each time they are at a center. If you give them all at the beginning they will typically forget or not pay attention because they are excited.

Side note: If a student has had to pull their card through the nine weeks and has ended up in time out, they will serve the time out time again at their party. DON! DON! DON!

Do you have good behavior rewards? What are they? 
What are some other quick and easy centers you could have at your party?


4

Free Choice Center

One of my favorite things about my new art room is the FREE CHOICE CENTER.  Many followers may recall my post I'm Finished, Now What!? That was the center at my last school. I have revamped this year with more ideas and choices. Thanks to Jessica at The Art of Education I decided to explain how I do "free choice".

I have these wonderful cubbies in my room that stretch along the whole wall.  So to distinguish where the actual free choice activities are, I taped off the area with yellow duct tape.  I also put a big sign on top.  Students are instructed to choose materials from above or inside the yellow area. 
When do I use free choice?
 - When a student finishes a project and there is still class time. - Sometimes as an activity with a sub. 
- When majority of the class is not present due to a school program during their art time. 

FREE CHOICE RULES
Must have teacher permission
Choose one activity at a time
Work at your seat
Put things away neatly
Only get 1 piece of free draw paper during your free choice time
Crayons, pencils, dry erase markers, and chalk only!

WHAT ARE MY CHOICES?
- Drawing books: kept in a green crate. I usually order drawing books, cut the pages out, put them into protective sleeves, and place them by category into plastic folders.

- Reading books: kept in a pink crate

- Free draw paper: copy paper


- Free drawing: students may get a drawing book and one piece of free draw paper to draw on the front and back. They can take it home with them that day or they may keep it in their table's folder to finish on another day.
I'm so proud of their ability to follow drawing directions! Both these photos were first graders.
- Dry erase papers: During the summer I put copy paper into page protectors and put duct tape at the top. Students get one dry erase paper, marker, and a SOCK to erase with. Used CLEAN socks are great for this. Plus, the kids think it's pretty cool too.
- Texture plates: I don't really understand the fascination with these, but okay. I encourage them to use the whole paper, draw a picture then color in the different areas with the textures, and make up animals to create the textures on.

-TANGOES: These are excellent. They are magnetic tangram pieces with booklets to show the kids how to construct the pictures. I also encourage then to make up their own pictures. I only have three of these and they are one of the first things chosen off the shelf. I purchased my set from Target.


Modeling Clay: I have tons of modeling clay that was just sitting in a box left from the last teacher. Never used. I had two kinds. One works better then the other. I had lots of colors so I put them into ziplock baggies. Students are instructed not to mix colors, not to make "bad" things, and to seal the bag closed when they are done. I told the students that if I noticed missing clay they would not have it as a choice anymore. So far no stealing... that I've noticed...
Love this little snail family.


I like this modeling clay the best because it doesn't stain your hands. I've used the clay since August and it shows no sign of drying out.
The other kind are typically in rectangular blocks and are not sectioned like these. They usually stain your hands. Thus, I don't use them.


Chalk Boards: I have a shelf of small and large chalk boards (see first picture of this post), white chalk, and sock erasers. I personally can't stand chalk boards, but my students love them.


My free draw self will change throughout the year depending on what deals I see in stores. I have also had puzzles, blocks, and legos. After Christmas break I'm going to add complete the picture sheets in page protectors so they may use dry erase markers.
I hope this helps with your Free Choice ideas.
3

Art Student Teacher Part 2

Before my student teachers arrived I thought about what I wanted to know as a student teacher... How is this classroom run, schedule, school policies / procedures, extra duties, clubs, and so on.  I also wanted to know what the teacher would expect of me and how they would "grade" me.

Upon our first meeting, I would look over Jessica's post over at The Art Of Education about the Top 10 Challenges of Managing an Art Room. I believe those are great stepping stones on which to discuss. 


The first document I gave them was this document, which explained my basic classroom procedures. 
They would also see this in action while observing for the first few days, but chances are they never get to see you explain all this to the kids. This document includes all the important "first days of school" information. As we all know, the first day is the most important, and most student teachers don't get to see you on the first day of school. 

The second document was a copy of my Pro and Con sheet. This sheet allowed me to write comments about the Pros and Cons of the lesson and or teaching. I would make copies of this front and back to save paper. I filled this out during 85% of the lessons they taught while I observed. We would always go over this sheet at the end of the day or during planning time.  I made sure to go over consistencies and inconsistencies during teaching. It is very important to remember that you are giving constructive criticism. 
Always go over a teaching schedule with your protege. Some universities will provide you with one to follow, but you may always make adjustments.  My schedule was as follows:
9 week student teacher
    Week 1: observe classes and assist during planning
    Week 2: observe and assist with classes and planning
Mentor teacher will assist in lessons taught by the student, observe, and take constructive notes
    Week 3: teach two (grade levels) of mentor teacher lessons, observe, and assist with classes and planning.
    Week 4: teach three (grade levels) of mentor teacher lessons, observe, and assist with classes and planning. Begin developing student teacher lessons. 
    Week 5: teach four (grade levels) of mentor teacher lessons, observe, and assist with classes and planning. Plan student teacher lessons. 
Mentor teacher will back away from assisting with lessons, but continue to observe and take notes
    Week 6: teach four (grade levels) of mentor teacher lessons and one student teacher lesson, and assist with classes and planning. Plan and implement student teacher lessons (1 to 2)
    Week 7: teach all classes of mentor teacher lessons and one to two student teacher lessons, and assist with planning
Mentor teacher will not assist with lessons, but will observe and take notes
   Week 8: Teach all classes of mentor and student teacher lessons, prepare, and plan future lessons.  No assistance will be given by mentor teacher during prep time. (mentor teacher must leave the room during at least two lessons)
   Week 9: Begin to phase mentor teacher back in. Monday: Teach all lessons. Tuesday: Teach 4 lessons. Wednesday: Teach 3 lessons. Thursday: Teach 2 lessons. Friday: Teach 1 lesson. 

This plan allowed for phase in and a quick phase out. The student teacher will be observed by a university official during this time as well.  I believe that the 8th week is the one that the most learning takes place. During that week I will not help with prep or during the lessons at all unless there are small things. I even make sure to be out of the room (working on my own plans of course) during some of these lessons.  They are basically on their own during this week.  The only reason I would not follow this plan would be if I had an ineffective student teacher and I knew my students were not getting the content and instruction they needed. 

It is my hope that this post will help those of you who have never hosted a student teacher or perhaps give you some new ideas.  I encourage each of you to try hosting a student teacher at least once in your careers. To see why I love having student teachers see my last post: Do You Want a Student Teacher? 
4

200 and Ahh-Ha Kindergarten Cutting


Thank you loyal followers! My little blog has reached 200 followers and is reaching 200,000 views! Thank you for always checking in time after time. 

Now for my AHH-HA moment.
My school has been low on paper this year.  Budget stuff, you know how it goes.  Therefore, any copies we make need to be reasonable.  Well, it's time for me to test some Kinder cutting skills.  I always wait until a month into school to do this.  In the past I have used this idea I got from Fun Art 4 Kids
I love this idea!  Working on cutting skills and showing growth from the beginning of the year and then again at the end of the year.  Students can take this home to show their parents as well.  But, this year I wasn't sure I wanted to use the paper just for this.  
So I thought to myself... How can we still work on cutting skills alone, and have it be repurposed... 
AHH - HA!
Why don't Kinders cut paper to be used for other projects.  Just like Painted Paper and Deep Space Sparkle have students paint and paint papers to use for other projects.  But, what to have them cut... I want to use my construction paper for other things...
AHH - HA!
My wonderful father-in-law works for Sherwin Williams and donated a ton of wall paper books just waiting for collages. 
Let's let those Kinders cut on these.  Here's the idea:
I love to use wall paper books, but don't always like the "big" paper covering the tables making mass chaos.  So I'm going to exacto the papers out of the books. Then draw out some quick squigglish, and straight lines and have the Kinders cut up the papers.  I know I will have to draw the lines, but it doesn't take long to draw simple curvy and straight lines.  I may even ask some student helpers to draw the lines during a "free choice" time. 
I will put the cut up wall paper pieces into my Warm - Cool - Neutral scrap drawers so they can be used for collages and mosaics. 
Wallpaper and what the back will look like before cutting.  Notice the lines progress in difficulty.  


3

Do You Want A Student Teacher?

When I was approached 2 years ago about wanting to take on a student teacher I thought, "YES". Why? Because I've been there and so have you.  I remember embarking on my own student teaching journey hoping and praying for a strong, kind, and great teacher that would take me under their wing.  In Tennessee we student teach under two teachers.  My first cooperating teacher was "Mrs. H".  I learned most of what I know from her.  Then, I had "Mrs. X" who taught me how not to teach.  It is because of these two teachers that I knew I owed it to this protégé to be a guide on his or her journey. 

I have had two student teachers in my career thus far.  Both came with pros and cons.  Having these two ladies made me better through their trials, errors, and successes.  In fact... they taught me a few new tricks!
Myself as a student teacher in Fall 2008 teaching the "Edible Color Wheel" 

My first student teacher Mrs. Matthews
 
My second protege, Shannon Torrey, teaching clay.
Pros of having a student teacher:
You will be molding a new art teacher
You will no longer be the "only" art person
Discuss professional development
Learn from each other
Mentor
You will learn more about yourself as a teacher and, if you use this new knowledge correctly, use it to become a better one.

Cons:
A little more work
Using planning time for more discussion to go over things
If the student teacher is having difficulty you may have to step in an maintain control or redirect
After the student teacher leaves you may have to reteach some management if need be.
You may have to deal with the fact that the kids might like that person more than you... Get over it! 

Having a student teacher is not for everyone. It was a wonderful learning opportunity for me and I do believe I am a better teacher because of it.  And who knows, you may have to leave the job that you love so much.  How fortunate would you be to be able to have someone you trained fill your position?  
I was fortunate enough to have Mrs. Shannon Torrey, my student teacher, replace me.  It made me feel so much better knowing she would take my place.  Before I left, a student told me, "If Mrs. Torrey gets to teach us it will be like a part of you."  Made my heart melt.  I thought to myself, this is why I taught a student teacher.  I encourage you to do the same to mold the next generation of art educators. 
Mrs. Torrey reading well wishes cards from students before she left for her next placement. 

Mrs. Torrey assisting students.


6

Pick & Draw

Talk about a great ice breaker! Thanks to Rich Davis creator of Pick & Draw I had a great activity for my new students during their first art class.

Pick & Draw is an awesome game  that is a fun one of a kind  drawing game.  It teaches students how to make crazy and creative cartoon faces. Which was exactly what I needed for my new students.

I didn't know their abilities or even what they had been exposed to from their last art teacher. Which, from what other teachers had told me, was not a lot.  So I decided to use this game not only as an Ice Breaker, but as an assessment pre-test.

Check out Pick & Draw for yourself to see what it's all about.  I used Pick & Draw during 3rd and 4th graders' first day.  It was a great way to end class after going over rules and procedures.

Here are the awesome results.


Back to Top